Tuesday, August 10, 2010

Old doll I bought at a yard sale

I got this beautiful doll for $4 recently. It's not something I look for at yard sales but it caught my eye and I couldn't stop thinking about it; it's just so beautiful to me. It came with a dress that I do not think was made for the doll but was either a baby dress or something for a larger child's doll. It all smelled pretty musty so I soaked the whole thing in a bucket of Bac-out then hung it out on the line to dry. The dress dried right away but the doll was still sopping wet after several hours. I decided to just rip her apart and pull out all the stuffing.

It appears that the doll was full of cotton balls. It was packed pretty tightly. I don't know what they used to stuff dolls with but this was stuffed long before the invention of polyester fiberfill, that's for sure. The only clue is a tiny scrap of floral print fabric that I left in my scanner at work (where I was so busy that I did not even have time to write this on my lunch).

Her face is in pretty nice condition and the arms and legs are complete except for a small chip off the left thumb. I'm going to re-stuff her and set her on my shelf as is. I love the patina on the cotton fabric and the hairline fracture at her neck. It should be pretty easy to put her back together but I have never attempted something like this before. I'll post a scan tomorrow of the little piece of fabric. I'm thinking 1940s.

Monday, August 09, 2010

Lego Sack with Window

Before our vacation, I spent a lot of time gathering books and toys to take with us. I searched for anything portable and with enough substance to keep the 2-year old occupied for "long" stretches of time. She loves legos (it's in the genes on both sides) and seemed ready for the upgrade to the smaller size so I bought the big set of pink Legos from Amazon. Of course we couldn't bring the massive tub with us on the plane so I decided to make a bag for them.

I had seen this amazing drawstring toy sack tutorial on Make it Perfect through Craft Gossip. At the time, I just thought it was very clever. I had no plans to actually make it. But then I bought some Yo Gabba Gabba panties and they came in this nice little pouch. Of course, I threw it away and had to dig it out of the trash when the thought came to me to make a little window out of the vinyl just like in the tutorial.

I wanted something more case-like so I didn't even follow the tutorial at all beyond the inspiration (although that might not have been a bad idea because she uses paperclips to hold the fabric to the vinyl since you can't pin through it. I just fought with it instead). I used Lizzy House's Red Letter Day again with the Pearl Bracelet print and more ducks. The tree stump fabric is by Jay McCarroll, my favorite winner of Project Runway, and grosgrain ribbon for the handles.

This, surprisingly, was not too difficult to make. I had to do a drawing of what I had in my head. Then I added some measurements to that. Then I kind of exploded the drawing and added seam allowances to my edges to figure out what to cut. The bottom has a layer of stabilizer/interfacing in it and I wish I would have used it on all sides because now that the case has seen some use, it's not as stiff as I would like. I expect our Lego collection to outgrow this soon but I'm impressed with it. Even though it is not perfect, I was proud to pull it off.

Friday, August 06, 2010

Giveaway Info (and another dress) . NOW CLOSED

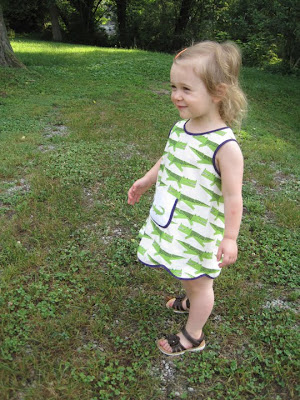
Here is my second go at the Pretty Pinafore by Carolina Fair Designs. I used the more boyish color of the alphabet fabric by Cosmo Cricket and let Zadie pick out the bias tape. We almost went with a bright raspberry to girl it up a bit but decided a dress was girly enough. You can read my review of the pattern and see more images here.

Carolina Fair Designs is giving away two patterns on this blog. You have two chances to enter. Go to her shop, pick out which design is your favorite, then leave a comment on each post (Wraparound dress here and Pretty Pinafore here). Make sure you leave some contact info or a way to find you.

Winners will be chosen August 16. Good luck and happy sewing. Yay!

THANKS TO ALL WHO COMMENTED! THE GIVEAWAY IS CLOSED.

Thursday, August 05, 2010

Pretty Pinafore by Carolina Fair Designs (with Giveaway!)

When I saw on the Carolina Fair Designs blog that she needed testers for a pattern, I jumped on the chance. Although I review patterns all the time, I had never been the first to try something. Plus, I liked working with the Wraparound Dress so much that I thought it would be a win-win. The Pretty Pinafore is another one-piece pattern that is super easy to make. The only bit of construction is to sew the shoulder seams together.

I used this amazing alligator (or is it crocodile?) fabric designed by Anda of boosterseat. She is in the process of moving right now so you can buy her fabric directly from Spoonflower or just wait. It will be worth it. She is an amazing person and so talented you won't believe it.

The little gator there on the pocket is a cross-stitch design from Andwabisabi. She has a ton of great patterns and they are very well priced. I wrote about stitching this before. I made quite a mess of it but my 2-year old doesn't mind and you can still tell it's a gator so that's all that really matters, right? I made the pocket from a bizarre collar that I bought at a thrift store. The packaging was hilarious. It has a crocheted lace edge to it that has now pulled out of my bias tape edging. I'll have to fix that but I'm not sure how.

The overall dress is so simple. After you stitch the shoulder seams together, you just apply your bias tape to the whole thing in one continuous loop. I do recommend that you stitch one edge of the tape down (right sides together) then fold it over and stitch it closed. I tried a quick and dirty one step method and the dress pulled out of the tape in several areas. I have been re-stitching them and it has taken far longer to fix my mistakes than it would have been just to sew it right the first time. But that seems to be how I do things...

As you can see it's a great fit. I like that it has a pinafore look but it's a dress. You can make a tunic or shirt version with this just like you can with the Wraparound Dress. Both hems are noted. A nice touch.

And check out this amazing little stop-animation video that Caroline made to demonstrate sewing the dress. It is really awesome. And only 1 minute long.

SORRY. COMMENTS ARE CLOSED. WINNERS ALREADY CHOSEN.

Don't forget that Caroline is giving away two patterns. To enter, go to her website, pick out which of the two patterns you would like and leave a comment on this post. For a second entry, go to yesterday's post and leave a comment there as well. Make sure you leave your email address or a way to find you! Winners will be chosen August 16.

Wednesday, August 04, 2010

Wraparound Dress by Carolina Fair Designs (with Giveaway!)

This past winter when we were completely snowed in, I wanted to sew really badly. I had some great fabric but I didn't have any good patterns to work with. So I searched Etsy and bought a few things. The first pattern to arrive in my inbox was this super cute dress by Carolina Fair Designs. I printed it out and taped together what I needed.

I only had 1/2 yard of each of these Petite Ecole fabrics from Kokka so I sliced apart the pattern at the shoulder seam and added a seam allowance. I think it adds a nice dimension to the dress. But what makes this pattern great is that you don't actually have to do any construction. The basic shape of the dress is cut from one piece of fabric. All you have to do is apply the bias tape and you're done. It should be quick and painless (unless you're me and have to learn the hard way).

As you can see, my finished product is a bit different than the original design. Remember my disastrous bias tape experiment? Well, I never did get it the way I wanted so I created a blend of a hem facing and a lining for the top of the dress using the dress I had made as the pattern (my bias tape situation had gone so awry that I had to cut out the cute little button detail). Had I not completely altered the neckline with my mistakes, I could have just used the original paper pattern.

Normally you would do a facing for the bottom hem of a shirt or skirt that has too much curve to it (a roll hem will just bunch up unless you have mad skills). Basically you're stitching the main garment to an identical lining piece (right sides together), clipping the curves and turning it inside out. Topstitch when you're finished to give it that more polished and professional look (I like using a contrasting color when I do my topstitching because it adds some visual interest). I did all that before I added the bias tape edge to finish the dress. If this makes absolutely no sense and you want me to explain it further, let me know and I'll make another one of these cute dresses and do a tutorial for you now that I have it all figured out.

Finally, I added this cute little pocket. I was going to buy a $7 wooden school bus button that Kokka also created as part of this line but thought that would be insane and added this adorable tape detail instead. It cost much less and I still have a lot of it to work with. I do have a good bit of the trim and the fabric left so I will be doing something else with it in the future.

SORRY. COMMENTS ARE CLOSED. WINNERS HAVE BEEN PICKED.

So now, on to the good stuff:
Caroline of Carolina Fair Designs and I have kept up our correspondence since my initial purchase of the pattern. I asked her if she wanted to giveaway one of these patterns on this blog and she said actually, she would give two! To enter, go to her website and take a look at the patterns. Leave a comment on this post stating which one you would like (we will not hold you to that decision, you can change your mind). Tomorrow, I'm going to post about the Pretty Pinafore pattern (in which I actually follow the rules). Enter again on tomorrow's post. I'll pick winners on Monday, August 16.

And make sure we can find you! Leave your email address or a link to a way to contact you. Thanks!

Tuesday, August 03, 2010

Oliver + S playsuit

I am now officially obsessed with Oliver + S patterns. This playsuit was an absolute breeze to make. I didn't have any problems cutting it out, putting it together, or stitching it up. It was so well written and easy to follow. The playsuit is part of the Tea Party Sundress pattern and seems more targeted to boys. But since we have enough dresses (for now) and I love rompers, I girled this up with some Lizzy House (pearl bracelet from the Red Letter Day collection) and Michelle Engel Bencsko (pre-Cloud 9 days). Who knew these two fabrics would look so good together? The two collections are radically different but were next to each other in my bin. The peach is a solid I had in my solids bin and is absolutely necessary to break up the two prints. I also used it to make some bias tape edging the hem of the shorts and to line the top.

After my initial problems deciding between buttons or snaps (thanks for all the help), I got over my fear of sewing buttonholes, and finally finished this up. I chose some very pretty little faux-pearl buttons with the scrolly detail.

The pattern had a snap tape option. I had never used snap tape before and I'm not even sure I knew what it was when I started searching for it. I don't have a sewing shop nearby (only quilting and upholstery) so I had to go online. What I saw came in massive quantities and in weird lengths and widths. The amount of space between each snap just didn't make sense. So I made my own (tutorial next week -- I had to test the technique out again).

I am super happy with how this little outfit turned out. My kid (for reasons unknown to us) is rather tall so I made the 2T top but cut the waist for the bottoms at the 3T mark. I'm glad I did this because it allows some room for the bulky cloth diapers for now and will hopefully still fit next year (if only for Spring). Anyway, I've not seen much cuter. I've added a couple of their patterns to my mental to do list. I just need to pick a size. The speed at which I'm working seems to be calling for 4T and up.

Monday, August 02, 2010

Summer

I feel like Summer is totally running away from me. It is really August. I am finally back from vacation (we went to Puerto Rico!) and a post-vacation trip to New York City.

In the works: a couple of super cute rompers that I made for Zadie, a week of travel tips (as promised from when I made the switch to Project:Project), a cool pattern giveaway along with some glowing reviews of one of my favorite Etsy designers, and more plans. I love to plan.

The sewing machine situation is finally remedied. Basically, the new machine was a dud. The one I bought was replaced with a brand new one that works perfectly. I can't wait to get back to sewing. The new baby just purrs. I am taking a "new owner" class this weekend to help me be less afraid of breaking it. My assignment is to get familiar with it but I don't even know where to begin.