Last year I designed this easy Christmas Tree skirt. I put together a tutorial but by the time everything was finished, it was too late so I decided to save it for now.
First you'll have to print out the pattern pieces, cut them out and tape them together along the line that's marked. Here is the bottom and here is the top. Print them out in landscape mode with no scaling. They should each easily fit on the page no matter what your printer margins are.
What you'll need:
4 fat quarters (or large scraps for the top). A quarter-yard cut will not be wide enough.
2/3 yard of something weighty like corduroy or a home decor fabric for the back (more if you're dealing with a directional pattern, less if the fabric is wider than 44")
1 pack of ric rack (more if you're making a larger skirt -- my Mom has 2 foot skirt radius and we needed just over 3 packs to make it all the way around)
thread and all that
This will fit with a four-foot tree (as shown above). If you want to make it bigger, add some paper below the rounded edge of the pattern and extend that curved line as long as you want it. Use a ruler to extend the straight lines. You will need to remove some of the top to compensate for a larger trunk.
This pattern piece will work for both the top of the skirt and the back. I used 8 sections for the top as shown. The back only has 4 sections to save some time piecing. So to make the same skirt, you'll need to cut 2 pieces each of 4 different fabrics for the top. Then for the back, fold the seam allowance under on one side (or just cut if off), and use that pattern to cut 4 pieces on the fabric's fold.
Lay out your top fabrics and stitch them together at the side seams RST (right sides together). You'll have seven seams. Do the same with your back fabrics. You'll have 3 seams. Iron your seams open (this will save bulk later).
Now, place the front on top of the back RST. Stitch the big rounded edge and the top edge and one side. You may want to leave a little section of the side open to tuck your ric rack into later. (I did not do this, I just popped the seam open with my seam ripper when I got to that point).
Clip those rounded seams. I like to make my clips about 2 inches apart. Every third clip I make v shape. This allows for easier turning.
Next, the fun part! Reach all the way inside the skirt and turn the whole thing inside-out. Beautiful! Press, press, press!
Tuck your seam allowance in on the open edge and pin that up. Then place your ric rack where you want it. Mine is about 2" from the bottom seam.
Pin about 1" of the tail of the trim into your pinned edge and stitch that seam closed. Finish placing the ric rack along the perimeter of the skirt and topstitch it into place.
When you get to the other straight edge, tuck the other tail of the trim into the opening you left and close everything up.
The last step is to topstitch your top. This will help it to lie flat.
I am happy to add more photos if anything seems confusing. Please let me know if you have any questions or problems with the pattern.
EDIT: There seemed to be some problems with the jpeg form of the pattern not printing the two pieces at the same size. I have uploaded pdfs and they seem fine.
Showing posts with label make. Show all posts
Sunday, November 28, 2010
Monday, November 22, 2010
Dollhouse furniture is also expensive. Make your own!
Even if you already own some dollhouse furniture, it's always fun to make more. Most of the following tutorials require little more than a hot glue gun and some cardboard. Some take it to the next level with wood and tools. Choose your own adventure.
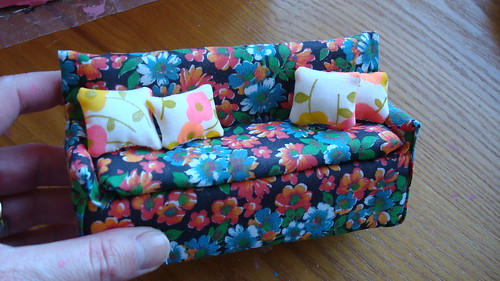
My friend Mel of Sparklerama, has two tutorials. First, this really cool sofa. All of the instructions are clearly described in her flickr. For this one, you start with a cardboard base, add some batting, cover with fabric, then upholster it. Looks easy. I can't wait to try it. She has several dollhouses for different types of dolls so take a peek at her photostream to get some inspiration.
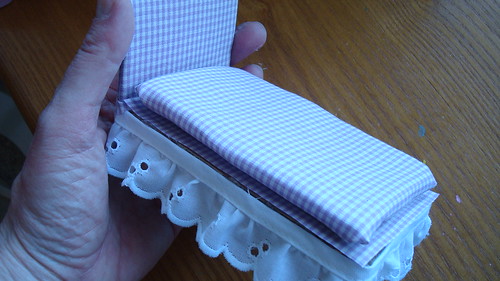
The second is for this cool bed. It's pretty much the same idea but with fewer steps. Mel has an Etsy shop where she sells miniatures that you should check out. I've got my eye on one of those rugs.
Catherine of Hyggelig has been busy making some amazing furniture for her daughter. While there aren't any tutorials (and you'll have to translate the site from German), I love the aesthetic and it looks doable. This dining table and bench are lovely. I like family seating like that. It reminds me of going to my Grandma's when I was little.
I also love this sofa. She explains how she made it very clearly. Click here and here for some other wonderful pieces. And tomorrow we'll have an interview with Catherine so stay tuned.
This gorgeous room is by Joel Henriques of Made by Joel from last week's post. He's using some tools but the simplicity of it makes it much less of challenge. I want that chair in my real life. And I honestly had never really given any thought to foliage in the dollhouse. What a great idea to use a real stick. I'm definitely stealing that idea.
For a little bit of holiday cheer, Ohdeedoh did a feature a couple of weeks ago on dollhouse Christmas trees that you can make.
Finally, I did some old fashioned searching on Google and weeded through the craziness to find this link list on cdhm, Custom Dolls, Houses & Miniatures. While for some of them you need to have a woodshop and a few of Santa's elves, many are simple and use polymer clay. I love the tip on how to add the crumb texture to the cake. It's definitely worth browsing through the tutorials to get some ideas on what you can make yourself.
My friend Mel of Sparklerama, has two tutorials. First, this really cool sofa. All of the instructions are clearly described in her flickr. For this one, you start with a cardboard base, add some batting, cover with fabric, then upholster it. Looks easy. I can't wait to try it. She has several dollhouses for different types of dolls so take a peek at her photostream to get some inspiration.
The second is for this cool bed. It's pretty much the same idea but with fewer steps. Mel has an Etsy shop where she sells miniatures that you should check out. I've got my eye on one of those rugs.
Catherine of Hyggelig has been busy making some amazing furniture for her daughter. While there aren't any tutorials (and you'll have to translate the site from German), I love the aesthetic and it looks doable. This dining table and bench are lovely. I like family seating like that. It reminds me of going to my Grandma's when I was little.
I also love this sofa. She explains how she made it very clearly. Click here and here for some other wonderful pieces. And tomorrow we'll have an interview with Catherine so stay tuned.
This gorgeous room is by Joel Henriques of Made by Joel from last week's post. He's using some tools but the simplicity of it makes it much less of challenge. I want that chair in my real life. And I honestly had never really given any thought to foliage in the dollhouse. What a great idea to use a real stick. I'm definitely stealing that idea.
For a little bit of holiday cheer, Ohdeedoh did a feature a couple of weeks ago on dollhouse Christmas trees that you can make.
Finally, I did some old fashioned searching on Google and weeded through the craziness to find this link list on cdhm, Custom Dolls, Houses & Miniatures. While for some of them you need to have a woodshop and a few of Santa's elves, many are simple and use polymer clay. I love the tip on how to add the crumb texture to the cake. It's definitely worth browsing through the tutorials to get some ideas on what you can make yourself.
Thursday, November 18, 2010
Wooden dollhouses are expensive. Make your own!
So I thought I'd put together a little round-up of some of my absolute favorite DIY dollhouses. A huge part of me is regretting not making one this year but it's something we'll definitely do in the future when Z and I can make it together -- probably for bigger dolls. So I guess you could call this, "How not to buy a wooden dollhouse."
Modern dollhouse:
Isn't this stellar? It's from Made by Joel. His blog is one of the ones that I click on immediately in my Reader when I see a new post. He's very talented and comes up with some great projects to do for kids and with kids. You don't need woodworking skills. The people who work at the "home improvement centers" will do a few cuts for you for free. This looks like one 1" X 6" cut into different widths and a few other bits.
Ikea Catalog Dollhouse:
This simple tutorial shows you how to take two pieces of cardboard or stiff posterboard and an Ikea catalog to make an awesome house. It's a great project you can do with your kid. From See the Woods and the Trees with an update here. I think that the Flor catalog would work well too. Great interiors.
Bookcase dollhouse:
I found this one ages ago at ohdeedoh. Unfortunately, the flickr account is no longer active so these are the only pictures we have. It's just a simple shelf with awesome furniture inside. You could easily customize this with scrapbook paper wallpaper and some handmade rugs.
Shelf Dollhouse:
Darlybird just appeared in my life via Grosgrain and was quickly added to my Reader. In a series of posts, she tells us everything she used to make this amazing dollhouse for her kids and includes links to some resources (like where to shop for that awesome re-ment stuff she's got in there). You'll need to read the first post, then click through to the series.
Foamcore Dollhouse:
Amy from Sweet Sweet Life posted a tutorial on how to make a dollhouse (similar to the Ikea catalog one) using foamcore. The tutorial is here, although the original idea came from Cookie Magazine (r.i.p., beloved tome). She made cute little dolls for it using pictures of Charlie and Lola. She has filled it with all kinds of mini goodness including some Calico Critters stuff that I recognize from my research. Amy's new blog is here.
Finally, there's always About.com. They have compiled a pretty good list of links for plans to make a real play dollhouse -- like cutting wood and stuff like that.
Next week I'll do a round-up post of making dollhouse furniture and more reviews. A couple sets have just arrived. For the rest of the dollhouse posts, click here then scroll to the bottom for links to the other posts. I'll get a link thing on the sidebar going sometime soon.
Oh, special thanks to everyone who was cool about letting me use their images. I contacted everyone I could find as these images don't belong to me.
Modern dollhouse:
Isn't this stellar? It's from Made by Joel. His blog is one of the ones that I click on immediately in my Reader when I see a new post. He's very talented and comes up with some great projects to do for kids and with kids. You don't need woodworking skills. The people who work at the "home improvement centers" will do a few cuts for you for free. This looks like one 1" X 6" cut into different widths and a few other bits.
Ikea Catalog Dollhouse:
This simple tutorial shows you how to take two pieces of cardboard or stiff posterboard and an Ikea catalog to make an awesome house. It's a great project you can do with your kid. From See the Woods and the Trees with an update here. I think that the Flor catalog would work well too. Great interiors.
Bookcase dollhouse:
I found this one ages ago at ohdeedoh. Unfortunately, the flickr account is no longer active so these are the only pictures we have. It's just a simple shelf with awesome furniture inside. You could easily customize this with scrapbook paper wallpaper and some handmade rugs.
Shelf Dollhouse:
Darlybird just appeared in my life via Grosgrain and was quickly added to my Reader. In a series of posts, she tells us everything she used to make this amazing dollhouse for her kids and includes links to some resources (like where to shop for that awesome re-ment stuff she's got in there). You'll need to read the first post, then click through to the series.
Foamcore Dollhouse:
Amy from Sweet Sweet Life posted a tutorial on how to make a dollhouse (similar to the Ikea catalog one) using foamcore. The tutorial is here, although the original idea came from Cookie Magazine (r.i.p., beloved tome). She made cute little dolls for it using pictures of Charlie and Lola. She has filled it with all kinds of mini goodness including some Calico Critters stuff that I recognize from my research. Amy's new blog is here.
Finally, there's always About.com. They have compiled a pretty good list of links for plans to make a real play dollhouse -- like cutting wood and stuff like that.
Next week I'll do a round-up post of making dollhouse furniture and more reviews. A couple sets have just arrived. For the rest of the dollhouse posts, click here then scroll to the bottom for links to the other posts. I'll get a link thing on the sidebar going sometime soon.
Oh, special thanks to everyone who was cool about letting me use their images. I contacted everyone I could find as these images don't belong to me.
Labels:
cardboard,
diy,
doll house,
dollhouse,
foamcore,
handmade,
make,
posterboard,
wooden
Subscribe to:
Posts (Atom)