Trumpeter Books has been releasing a series of amazing Japanese craft books translated into English. I enjoyed working with Linen, Wool, Cotton by Akiko Mano so I thought I'd give Carefree Clothes for Girls by Junko Okawa a try. The patterns are printed in the usual Japanese style, all piled in top of each other on one big sheet folded up in the back of the book. They are printed in two colors so it is a tad bit easier than you would expect. You either need to photocopy the patterns you want or tape the sheet to a window and trace onto other paper. I have not had any success using a tracing wheel and transfer paper as these big sheets always seem to shift around on me.
The photographs are fun and gorgeous and the illustrations in the directions leave nothing to the imagination. I found a wide range of skill levels to the projects as well. If you can't do the more complicated or time-consuming bits of construction, there are still a few cute pieces to make. I do have to add that some of these garments are a bit odd -- so coming from me, you should probably take a look at this in a bookstore before you buy it unless you want to take a risk. You know my style is a bit out there. Some of these outfits have the kids looking like ruffians from a Charles Dickens novel. You just need to use your imagination if you like a more polished look. That's what's awesome about sewing your own stuff -- you can do whatever you want with a pattern -- or just use it for inspiration. There is certainly a lot of that to be found.
Do remember that these clothes are for girls -- not toddlers. The patterns are for sizes 4 - 7. I'd also recommend that you look at the measurements before cutting. Inches are provided for all of the patterns where fit may be an issue (you really should do that for any pattern). Luckily, my child is massive so when this deep freeze passes, I'm going to be making my little one a couple of pieces from this book.
Showing posts with label pattern review. Show all posts
Monday, January 24, 2011
Monday, November 15, 2010
The Crystal top
As soon as my Wonderland fabric arrived in the mail, I knew exactly what I wanted to use it for. I love how effortlessly it goes with the Lizzy House ducks.
And that's Crystal there in the middle on her first day of school! Weren't the 1970s amazing? (Happy 40th!!!). That is not my husband beside her. That is one of the neighbors. He would have been just out of diapers at the time.
I used a bright blue zipper in the back, royal blue bias tape for the hem, and the same color ric rack for the trim across the top. Also, I used my sewing machine's reinforced straight stitch to topstitch around the collar in the blue to give it a little kick. The sleeves on this thing are like crazy butterflies. I thought it would settle down a bit after a washed it but no luck. The pattern was actually super easy to use and I didn't have any problems with it at all. Very quick. More pics on flickr.
I used this amazing vintage pattern that my Mother-in-Law let me borrow. She made this pattern for my Sister-in-Law's first day of school way back when. Although the pattern is a 3, as you can see, it's huge. This Winter we'll layer with some long sleeves underneath -- or maybe a thermal.
I used a bright blue zipper in the back, royal blue bias tape for the hem, and the same color ric rack for the trim across the top. Also, I used my sewing machine's reinforced straight stitch to topstitch around the collar in the blue to give it a little kick. The sleeves on this thing are like crazy butterflies. I thought it would settle down a bit after a washed it but no luck. The pattern was actually super easy to use and I didn't have any problems with it at all. Very quick. More pics on flickr.
Labels:
handmade,
pattern review,
sewing,
vintage pattern
Thursday, September 09, 2010
Travel tips: Beware the Chupacabras
Around here, we take our souvenirs to the next level. While in Puerto Rico this Summer, we decided to check out some gift shops near the rainforest since the rainforest was closed due to the tropical storm hovering over us for several days (yeah, yeah, you've heard it before). I hadn't really liked any of the t-shirts in the shop until I came across this AMAZING chupacabra design. Unfortunately, they didn't have any in Zadie's size but it hit me that I could buy the largest one in the shop and cut it up to make a dress.
I used this pattern that I bought off Etsy and didn't really have any problems with it. I made the size 3t. If I were to make this again either larger or smaller, I would make sure that the width of the shoulder seams on the bodice matched the straps. They are spot on for the 3 but as the pattern uses the same strap, it won't be even with all sizes.
The dress is a great fit and should also work next year. I liked how it has a self-lined bodice so it's very soft on the inside. I purposely added the black panel and off-set the image just for visual interest. I don't really like centering things (if you hadn't noticed). The rest of the fabric is from old t-shirts we have in the stuff-to-repurpose bin. I also used my machine's J foot and did faux serged seams for the skirt. That's an amazing technique and I plan to post about it.
I love the Chupa's glowing red eyes in the drawing. It reminds me of our very own mothman. Just in case you need a gentle reminder, we are huge fans of the yeti around here. My own obsession dates back to (roughly) 1983 and a papier mache project gone terribly awry. El Chupa Cabras is another of the cryptids. He originated in Puerto Rico in the mid-1990s. Some fascinating stuff. We were lucky to avoid him (probably because of all the rain).But one of the reasons I love to travel is to learn about stuff like this. And although I knew about the chupacabras, I didn't know he was from PR. Whenever we go someplace new, I make sure to read fiction by local authors and I get as many guidebooks as possible to learn the history of the place. And buying a shirt like this and making it work really adds to the whole experience. I will keep this dress forever. I would not have kept the shirt forever had we bought one that fit.
Watch out or the Chupa will get ya! This one's female and her claws are sharp.
Labels:
chupacabra,
el chupa cabras,
handmade,
pattern review,
sewing,
souvenir,
t-shirt,
upcycled
Tuesday, August 31, 2010
Tillbrook Romper
After seeing this post over at Mon Ami, I had to buy this pattern and make the romper myself. I found Mon Ami Journal through the Elsie Marley Kids Clothes Week challenge and both are excellent blogs for inspiration.
Luckily, I found the pattern on Etsy right away. It was a size 3. Perfect!
The pattern was super easy to follow. I didn't have any issues with the instructions or the fabric. I chose Alexander Henry's Tillbrook Sprites for the body of the romper and some of the coordinating print for the straps. There is a LOT of pink in the pattern so I went with a solid green for the top and I love how it pulled out the hints of different greens from the foliage around the fairies.
I used teeny tiny buttons for the top closure. They have a hint of pearl to them that's a welcome shimmer against the bold green. The ones in this photo are green. The original buttons are red so they pop out more against the solid.
The 3t is a bit roomy but I'm hoping we'll get some use out of this next year. In fact, it seems like there is a trend toward vanity sizing in kids clothes and that really pisses me off. Kids clothing should correspond as closely as possible to the age. Two-year olds should be able to wear a size 2, three-year olds should be able to wear a size 3, etc. Of course there will be bigger kids and smaller kids but you get the idea. Zadie grew out of most 2t big box store clothing right about the time she turned 2. But when I sew vintage clothing patterns in a size 3 they are massive. Ok, end rant.
Anyway, to solve the problem of the romper being enormous, I just sewed a second button about an inch above the original. I took the photo above (with gnome) after putting the romper on her for the first time. In most of the shots, it is just hanging off of her (and her hair is wild). The new button makes it fit much better and when she grows, we'll just start using the lower button. This is the garment I used for the snap tape tutorial so you're finally able to see it in action. I don't know why it took me almost 3 weeks to sew a couple of buttons on.
Friday, August 06, 2010
Giveaway Info (and another dress) . NOW CLOSED
Here is my second go at the Pretty Pinafore by Carolina Fair Designs. I used the more boyish color of the alphabet fabric by Cosmo Cricket and let Zadie pick out the bias tape. We almost went with a bright raspberry to girl it up a bit but decided a dress was girly enough. You can read my review of the pattern and see more images here.Carolina Fair Designs is giving away two patterns on this blog. You have two chances to enter. Go to her shop, pick out which design is your favorite, then leave a comment on each post (Wraparound dress here and Pretty Pinafore here). Make sure you leave some contact info or a way to find you.
Winners will be chosen August 16. Good luck and happy sewing. Yay!
THANKS TO ALL WHO COMMENTED! THE GIVEAWAY IS CLOSED.
Labels:
etsy,
giveaway,
handmade,
pattern review,
pretty pinafore,
sewing,
sewing pattern
Thursday, August 05, 2010
Pretty Pinafore by Carolina Fair Designs (with Giveaway!)
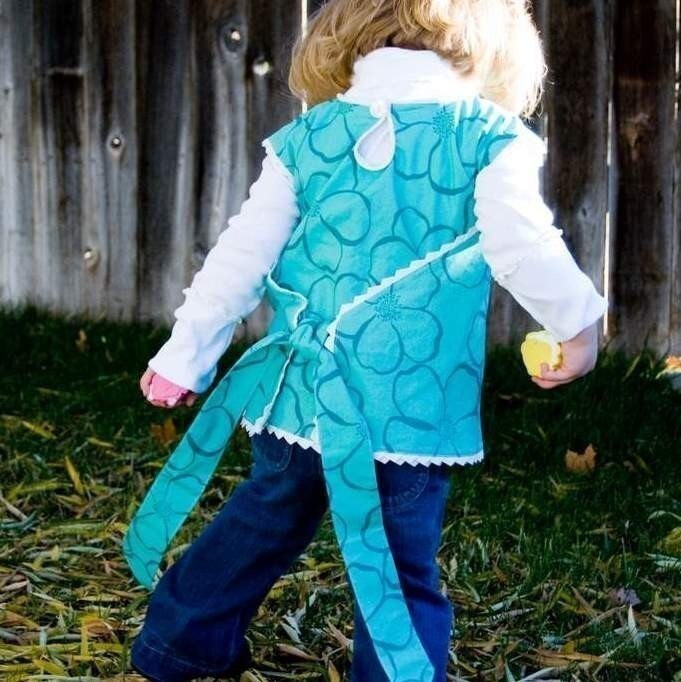
When I saw on the Carolina Fair Designs blog that she needed testers for a pattern, I jumped on the chance. Although I review patterns all the time, I had never been the first to try something. Plus, I liked working with the Wraparound Dress so much that I thought it would be a win-win. The Pretty Pinafore is another one-piece pattern that is super easy to make. The only bit of construction is to sew the shoulder seams together.
I used this amazing alligator (or is it crocodile?) fabric designed by Anda of boosterseat. She is in the process of moving right now so you can buy her fabric directly from Spoonflower or just wait. It will be worth it. She is an amazing person and so talented you won't believe it.
The little gator there on the pocket is a cross-stitch design from Andwabisabi. She has a ton of great patterns and they are very well priced. I wrote about stitching this before. I made quite a mess of it but my 2-year old doesn't mind and you can still tell it's a gator so that's all that really matters, right? I made the pocket from a bizarre collar that I bought at a thrift store. The packaging was hilarious. It has a crocheted lace edge to it that has now pulled out of my bias tape edging. I'll have to fix that but I'm not sure how.
The overall dress is so simple. After you stitch the shoulder seams together, you just apply your bias tape to the whole thing in one continuous loop. I do recommend that you stitch one edge of the tape down (right sides together) then fold it over and stitch it closed. I tried a quick and dirty one step method and the dress pulled out of the tape in several areas. I have been re-stitching them and it has taken far longer to fix my mistakes than it would have been just to sew it right the first time. But that seems to be how I do things...
As you can see it's a great fit. I like that it has a pinafore look but it's a dress. You can make a tunic or shirt version with this just like you can with the Wraparound Dress. Both hems are noted. A nice touch.SORRY. COMMENTS ARE CLOSED. WINNERS ALREADY CHOSEN.
Don't forget that Caroline is giving away two patterns. To enter, go to her website, pick out which of the two patterns you would like and leave a comment on this post. For a second entry, go to yesterday's post and leave a comment there as well. Make sure you leave your email address or a way to find you! Winners will be chosen August 16.
Wednesday, August 04, 2010
Wraparound Dress by Carolina Fair Designs (with Giveaway!)
This past winter when we were completely snowed in, I wanted to sew really badly. I had some great fabric but I didn't have any good patterns to work with. So I searched Etsy and bought a few things. The first pattern to arrive in my inbox was this super cute dress by Carolina Fair Designs. I printed it out and taped together what I needed.
I only had 1/2 yard of each of these Petite Ecole fabrics from Kokka so I sliced apart the pattern at the shoulder seam and added a seam allowance. I think it adds a nice dimension to the dress. But what makes this pattern great is that you don't actually have to do any construction. The basic shape of the dress is cut from one piece of fabric. All you have to do is apply the bias tape and you're done. It should be quick and painless (unless you're me and have to learn the hard way).
As you can see, my finished product is a bit different than the original design. Remember my disastrous bias tape experiment? Well, I never did get it the way I wanted so I created a blend of a hem facing and a lining for the top of the dress using the dress I had made as the pattern (my bias tape situation had gone so awry that I had to cut out the cute little button detail). Had I not completely altered the neckline with my mistakes, I could have just used the original paper pattern.
Normally you would do a facing for the bottom hem of a shirt or skirt that has too much curve to it (a roll hem will just bunch up unless you have mad skills). Basically you're stitching the main garment to an identical lining piece (right sides together), clipping the curves and turning it inside out. Topstitch when you're finished to give it that more polished and professional look (I like using a contrasting color when I do my topstitching because it adds some visual interest). I did all that before I added the bias tape edge to finish the dress. If this makes absolutely no sense and you want me to explain it further, let me know and I'll make another one of these cute dresses and do a tutorial for you now that I have it all figured out.
Finally, I added this cute little pocket. I was going to buy a $7 wooden school bus button that Kokka also created as part of this line but thought that would be insane and added this adorable tape detail instead. It cost much less and I still have a lot of it to work with. I do have a good bit of the trim and the fabric left so I will be doing something else with it in the future.SORRY. COMMENTS ARE CLOSED. WINNERS HAVE BEEN PICKED.
So now, on to the good stuff:
Caroline of Carolina Fair Designs and I have kept up our correspondence since my initial purchase of the pattern. I asked her if she wanted to giveaway one of these patterns on this blog and she said actually, she would give two! To enter, go to her website and take a look at the patterns. Leave a comment on this post stating which one you would like (we will not hold you to that decision, you can change your mind). Tomorrow, I'm going to post about the Pretty Pinafore pattern (in which I actually follow the rules). Enter again on tomorrow's post. I'll pick winners on Monday, August 16.
And make sure we can find you! Leave your email address or a link to a way to contact you. Thanks!
Friday, May 28, 2010
Project: Special Robot Dress for the Robot Party (and free pattern)
I bought the fabric and trim for this dress long before I had any idea that I was going to throw a robot party extravaganza. But since it takes me months to get around to any of my sewing projects, the robot party was a fresh idea when I was putting it together and it just seemed right to do some applique. The fabric is a white dotted swiss with yellow dots that I just adore.
The pattern is a vintage Simplicity pattern 6241 from 1974 (a great year, I must say). It was an absolute breeze to put together and it fits really well. As with most crew neck patterns, I had to take the collar down about 1". I also straightened out the curved lines at the side seams to make it more A-line.
The robot applique is my own design based loosely on the robots I was sewing for my Etsy shop back in 2006. I pasted the pattern below. You can read my applique tutorial in detail here. The embroidery is mostly a backstitch. I included the legs but as you can see, I used ric rack instead and it gives a really nice feel to the piece.
Thursday, April 08, 2010
Project: Simplicity 8018
Simplicity? Um, no. Finished? Finally. This shirt was the bane of my existence for weeks. After having an easy time choosing the fabric and getting the supplies together, I was super excited to get started. I love this faux silk stuff. It has a nice tooth to it and it actually seems pretty sturdy. But wow was it a pain to cut. Plus I was trying to be all nice to the vintage pattern (1977) and preserve the lines for the other size (never again, from now on I will whack away -- I'm not a vintage pattern library). What a challenge this whole thing was!
First, I didn't have enough fabric. I thought maybe I had them cut the wrong amount but after buying fabric to make another of these (I'll get to that later), I am thinking that the width of it must have been less than the normal 44". I'm not sure but after playing Tetris will all the pattern pieces, I know something was up and I've already started blocking that from my memory.
The zipper was easy to put in. I used this tutorial from Sew, Mama, Sew. Definitely take care to put those teeth right at your seam. It's very important. I had a couple of problems with the collar and need to make some adjustments for some issues that you can't see in the photos. I'll have to rip part of it out and re-sew. It shouldn't take long. The sleeves in the original do not have the extra gathering detail you see in the photos. The directions expect you to ease the fabric -- even though they list several potential fabrics, few of which actually "ease." I solved the problem by adding the gather. Since I have small shoulders, a little poof on the sleeve is a good thing. I am proud of myself for making that work.The most challenging part of the construction was the hem. Again with the ease! This fabric does not ease so I ended up cutting more of the interfacing fabric using the same pattern pieces, put right sides together and stitched it up. Then I clipped my curves like a maniac, turned and topstitched as directed. I ended up going in with my pinking shears and cutting the extra way down to about 1/4" because it was hanging funny.
Finally, the pattern for the belt did not make it long enough for my taste. My MIL suggested that I sew in a little snap and do a fake squareknot. I think that's a good idea but I doubt I'll actually get around to it. Overall, I love the this top. I think it fits perfectly, is very slimming, and very comfortable. And guess what? After all that hassle, I'm actually going to work with this pattern again. More on that tomorrow.
Thanks to Mr. Lemon for taking these pictures of me. We walked across the street because I thought the color of our neighbor's wall would look good with the shirt.
Labels:
handmade,
pattern challenge,
pattern review,
seitz,
sewing,
shirt,
simplicity 8018,
teal
Monday, March 08, 2010
Project: Corduroy
With the feeling of Spring in the air, I've decided to get all the corduroy out of my system to make way for bulbs popping through the snow, buds on the forsythia, and huge doses of antihistamines and decongestants. Go March!
I made this adorable dress using a the Parisian pattern from ManiMina on Etsy. The collar piece absolutely gave me fits. I could not get the pattern to make sense at all so I ended up fudging it. After a couple of tries, I got it to work and actually made two of these. The armholes were too tight on this one for my niece so I adjusted the pattern 1/2" on each pattern piece so that it would work better for her.
The floral fabric is a very fine wale corduroy that I got at JoAnn's. It's soft and gorgeous and has washed up really well. The collar is linen because I thought that would really add to the Fall feel to the dress. Zadie has gotten a lot of wear out of this and both girls call it their "pretty dress" and beg to wear them when they're fresh out of the wash. I just love the vintage button I used for the closure paired with a satin ribbon.
Subscribe to:
Posts (Atom)