Showing posts with label linen. Show all posts

Monday, January 24, 2011

Book Review: Carefree Clothes for Girls

Trumpeter Books has been releasing a series of amazing Japanese craft books translated into English. I enjoyed working with Linen, Wool, Cotton by Akiko Mano so I thought I'd give Carefree Clothes for Girls by Junko Okawa a try. The patterns are printed in the usual Japanese style, all piled in top of each other on one big sheet folded up in the back of the book. They are printed in two colors so it is a tad bit easier than you would expect. You either need to photocopy the patterns you want or tape the sheet to a window and trace onto other paper. I have not had any success using a tracing wheel and transfer paper as these big sheets always seem to shift around on me.

The photographs are fun and gorgeous and the illustrations in the directions leave nothing to the imagination. I found a wide range of skill levels to the projects as well. If you can't do the more complicated or time-consuming bits of construction, there are still a few cute pieces to make. I do have to add that some of these garments are a bit odd -- so coming from me,  you should probably take a look at this in a bookstore before you buy it unless you want to take a risk. You know my style is a bit out there. Some of these outfits have the kids looking like ruffians from a Charles Dickens novel. You just need to use your imagination if you like a more polished look. That's what's awesome about sewing your own stuff -- you can do whatever you want with a pattern -- or just use it for inspiration. There is certainly a lot of that to be found.

Do remember that these clothes are for girls -- not toddlers. The patterns are for sizes 4 - 7. I'd also recommend that you look at the measurements before cutting. Inches are provided for all of the patterns where fit may be an issue (you really should do that for any pattern). Luckily, my child is massive so when this deep freeze passes, I'm going to be making my little one a couple of pieces from this book.

Monday, September 20, 2010

After I can sew no more...

In the evenings when I'm shot, I like to watch TV. I hate to just sit there though so I bought this awesome cross-stitch pattern from Heidi Kinney's Etsy shop. It's a fabulous rendition of Snow White and the Seven Dwarves. I'm using some linen that I got locally (after spending hours searching the web). I'm not sure if it's the 32-count in the sample or not but it is working just fine.

I switched up the colors a bit to match Zadie's room: orange, apple green and aqua instead of red, kelly green and royal blue. It's lovely to count. I guess I like doing math and stuff. When I'm working on a small project, I keep all the gear in one of those bags that curtains come in. It keeps everything contained and neat. See the safety pins? Yeah, I don't like to use an embroidery hoop (plus mine is broken). Maybe that will change after a visit to Michael's.

I would love to make an apron for a dress out of this. That was the plan. But I've spent 3 - 4 hours on this already and I have 3 hats, a shirt, a belt, and one belt buckle stitched. So this was originally a kids clothing week item but we'll see. I estimated this would take me 22 days to stitch.

I blurred the pattern in the photo because even though the resolution of the image is small, I didn't want someone to be able to use it from the blog.

Wednesday, August 04, 2010

Wraparound Dress by Carolina Fair Designs (with Giveaway!)

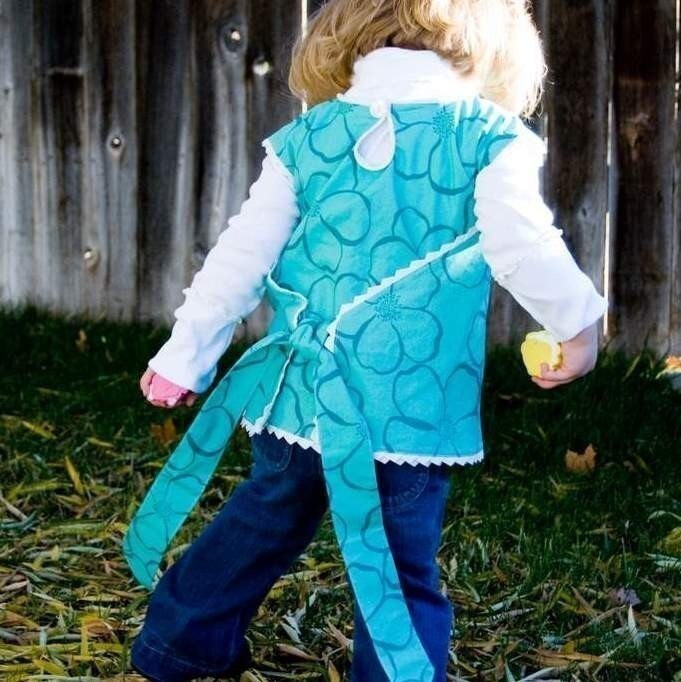
This past winter when we were completely snowed in, I wanted to sew really badly. I had some great fabric but I didn't have any good patterns to work with. So I searched Etsy and bought a few things. The first pattern to arrive in my inbox was this super cute dress by Carolina Fair Designs. I printed it out and taped together what I needed.

I only had 1/2 yard of each of these Petite Ecole fabrics from Kokka so I sliced apart the pattern at the shoulder seam and added a seam allowance. I think it adds a nice dimension to the dress. But what makes this pattern great is that you don't actually have to do any construction. The basic shape of the dress is cut from one piece of fabric. All you have to do is apply the bias tape and you're done. It should be quick and painless (unless you're me and have to learn the hard way).

As you can see, my finished product is a bit different than the original design. Remember my disastrous bias tape experiment? Well, I never did get it the way I wanted so I created a blend of a hem facing and a lining for the top of the dress using the dress I had made as the pattern (my bias tape situation had gone so awry that I had to cut out the cute little button detail). Had I not completely altered the neckline with my mistakes, I could have just used the original paper pattern.

Normally you would do a facing for the bottom hem of a shirt or skirt that has too much curve to it (a roll hem will just bunch up unless you have mad skills). Basically you're stitching the main garment to an identical lining piece (right sides together), clipping the curves and turning it inside out. Topstitch when you're finished to give it that more polished and professional look (I like using a contrasting color when I do my topstitching because it adds some visual interest). I did all that before I added the bias tape edge to finish the dress. If this makes absolutely no sense and you want me to explain it further, let me know and I'll make another one of these cute dresses and do a tutorial for you now that I have it all figured out.

Finally, I added this cute little pocket. I was going to buy a $7 wooden school bus button that Kokka also created as part of this line but thought that would be insane and added this adorable tape detail instead. It cost much less and I still have a lot of it to work with. I do have a good bit of the trim and the fabric left so I will be doing something else with it in the future.

SORRY. COMMENTS ARE CLOSED. WINNERS HAVE BEEN PICKED.

So now, on to the good stuff:
Caroline of Carolina Fair Designs and I have kept up our correspondence since my initial purchase of the pattern. I asked her if she wanted to giveaway one of these patterns on this blog and she said actually, she would give two! To enter, go to her website and take a look at the patterns. Leave a comment on this post stating which one you would like (we will not hold you to that decision, you can change your mind). Tomorrow, I'm going to post about the Pretty Pinafore pattern (in which I actually follow the rules). Enter again on tomorrow's post. I'll pick winners on Monday, August 16.

And make sure we can find you! Leave your email address or a link to a way to contact you. Thanks!

Monday, March 08, 2010

Project: Corduroy

With the feeling of Spring in the air, I've decided to get all the corduroy out of my system to make way for bulbs popping through the snow, buds on the forsythia, and huge doses of antihistamines and decongestants. Go March!

I made this adorable dress using a the Parisian pattern from ManiMina on Etsy. The collar piece absolutely gave me fits. I could not get the pattern to make sense at all so I ended up fudging it. After a couple of tries, I got it to work and actually made two of these. The armholes were too tight on this one for my niece so I adjusted the pattern 1/2" on each pattern piece so that it would work better for her.

The floral fabric is a very fine wale corduroy that I got at JoAnn's. It's soft and gorgeous and has washed up really well. The collar is linen because I thought that would really add to the Fall feel to the dress. Zadie has gotten a lot of wear out of this and both girls call it their "pretty dress" and beg to wear them when they're fresh out of the wash. I just love the vintage button I used for the closure paired with a satin ribbon.