

Tuesday, November 30, 2010
Thank you, Craft Gossip!
Monday, November 29, 2010
Dollhouse furniture review: Le Toy Van

This line is imported from England so that probably explains the $$$. But Le Toy Van or Hotaling (the distributor) is known for their quality and design. This was in my Amazon cart for a couple of weeks at about $15 then all of a sudden skyrocketed to $19.99 as I was waiting for my Swagbucks giftcards to post (more on Swagbucks later). I want to be mad at Le Toy Van but I honestly couldn't find a flaw worthy of much complaint.
Scale: These are identical in scale to the Plan Toys, Educo/Hape and the Ryan's Room sets that I have previously reviewed. As you can see, they are a smidge big for the Calico Critters (or Sylvanian Families) pandas that we love. Also, they are slightly larger than the Enchantmints mushroom stuff.
Quality: I'm very pleased with the quality of these sets. I don't think they are hand-painted. Everything is done very precisely. I only found a couple of spots of imperfection and that could have been due to transport. Where glue seeped through the seams, it was wiped away. I didn't really find any splinters or jagged edges on anything. Because of the price, I was really looking hard for flaws! The only thing that's bothering me is that the oven door doesn't want to stay shut. I've got to do something about that.
Overall, I have to recommend these sets. The detail is very nice. The little sprayer on the sink is attached with elastic cord so it has some resistance just like in real life. There aren't any shelves in the fridge so you can't really put stuff in it. We may have to make some. I bought this specifically for the little polka dot teapot and it's better in the picture. Just sayin'.
If you want to read the rest of my dollhouse furniture reviews, click here.
Sunday, November 28, 2010
Reversible Christmas Tree Skirt Pattern and Tutorial

First you'll have to print out the pattern pieces, cut them out and tape them together along the line that's marked. Here is the bottom and here is the top. Print them out in landscape mode with no scaling. They should each easily fit on the page no matter what your printer margins are.
What you'll need:
4 fat quarters (or large scraps for the top). A quarter-yard cut will not be wide enough.
2/3 yard of something weighty like corduroy or a home decor fabric for the back (more if you're dealing with a directional pattern, less if the fabric is wider than 44")
1 pack of ric rack (more if you're making a larger skirt -- my Mom has 2 foot skirt radius and we needed just over 3 packs to make it all the way around)
thread and all that
This will fit with a four-foot tree (as shown above). If you want to make it bigger, add some paper below the rounded edge of the pattern and extend that curved line as long as you want it. Use a ruler to extend the straight lines. You will need to remove some of the top to compensate for a larger trunk.

Lay out your top fabrics and stitch them together at the side seams RST (right sides together). You'll have seven seams. Do the same with your back fabrics. You'll have 3 seams. Iron your seams open (this will save bulk later).
Now, place the front on top of the back RST. Stitch the big rounded edge and the top edge and one side. You may want to leave a little section of the side open to tuck your ric rack into later. (I did not do this, I just popped the seam open with my seam ripper when I got to that point).
Clip those rounded seams. I like to make my clips about 2 inches apart. Every third clip I make v shape. This allows for easier turning.
Next, the fun part! Reach all the way inside the skirt and turn the whole thing inside-out. Beautiful! Press, press, press!


I am happy to add more photos if anything seems confusing. Please let me know if you have any questions or problems with the pattern.
EDIT: There seemed to be some problems with the jpeg form of the pattern not printing the two pieces at the same size. I have uploaded pdfs and they seem fine.
Thursday, November 25, 2010
Handmade Dollhouse Furniture on Etsy
After you try making your own miniatures and realize how hard it is, you can buy stuff that other people make. I seriously can't believe some of this stuff is handmade. I sifted through thousands of dollhouse stuff on Etsy and came up with a list of really amazing finds. There is no information on scale for some of these items. But, hey, the good thing about handmade stuff is that you can just ask the person who made it.
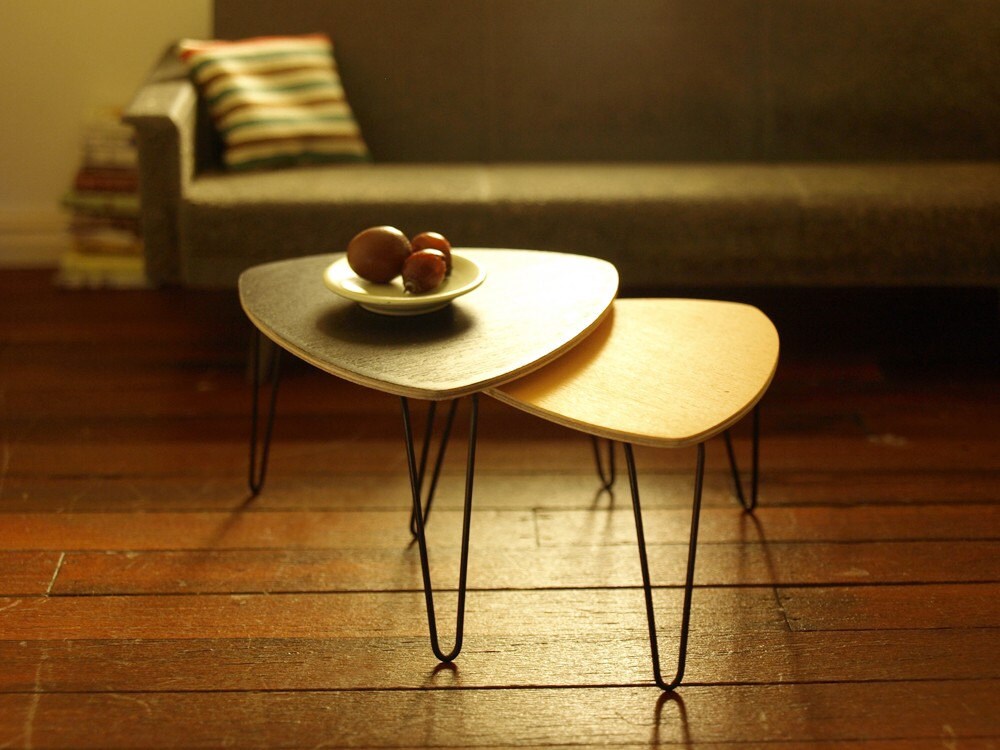
 These nesting/stacking tables had me at hello. Check out miniaturesbyannina. Oh, and this too.
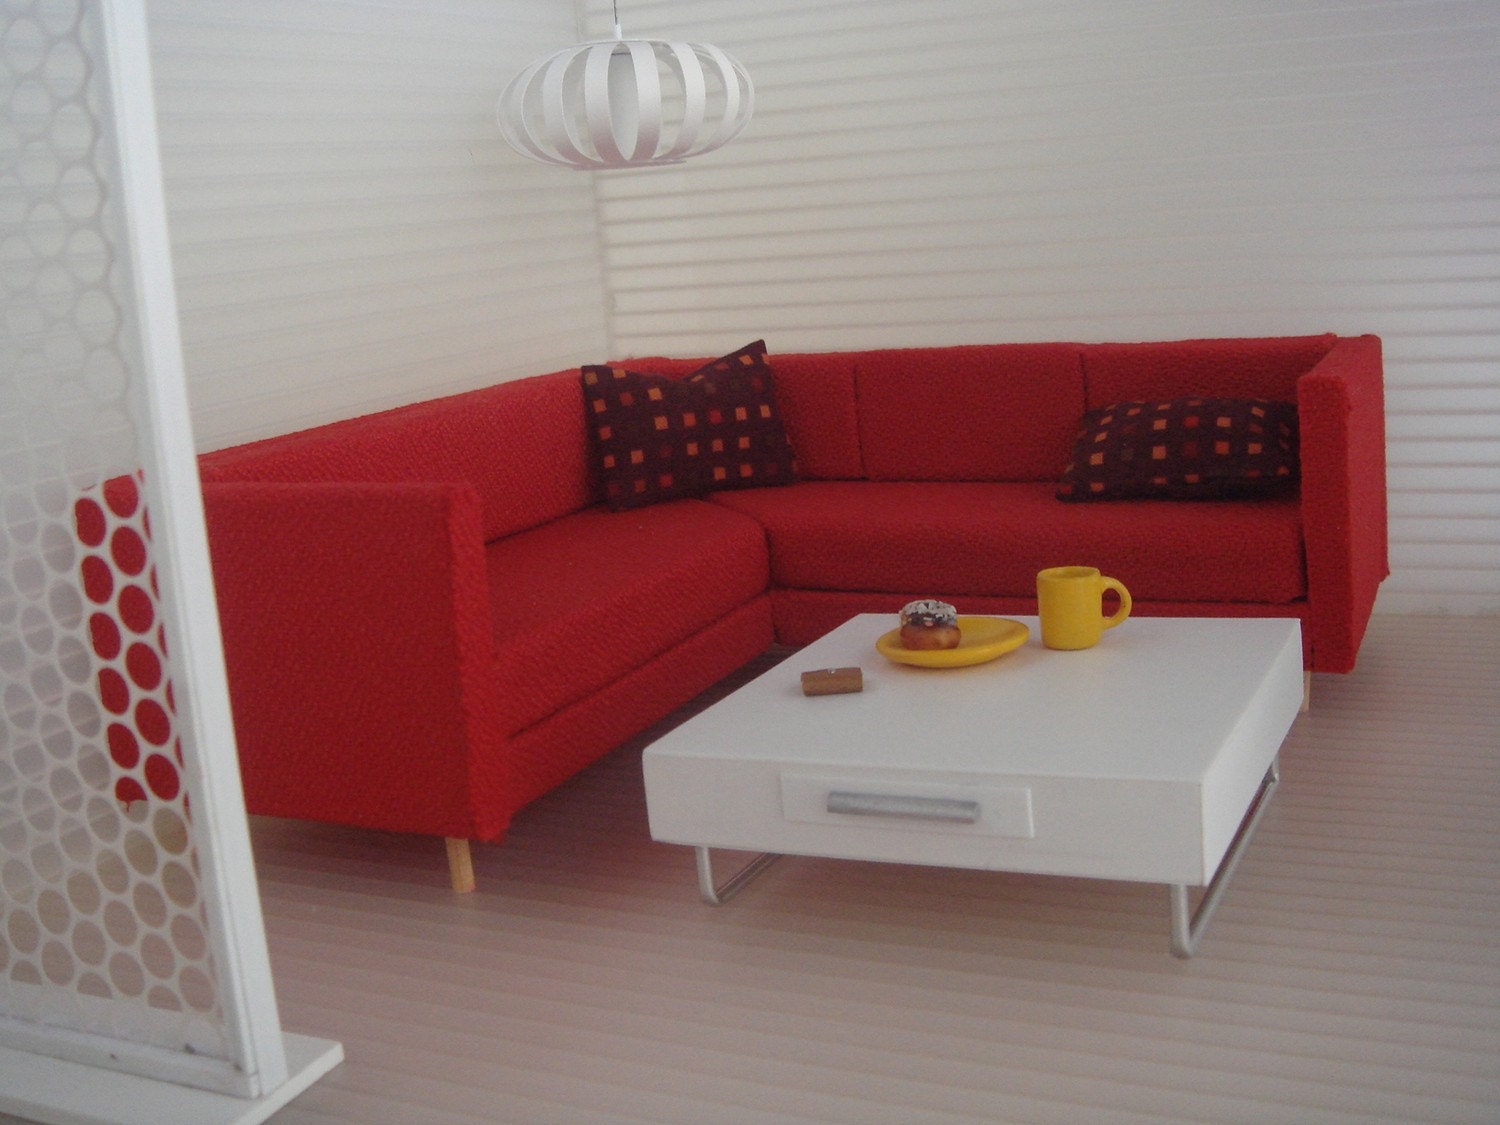
 I had this couch in real life once. This one is cleaner. Red sectional by minimodernistas. Click over to the sold items for a real treat.
 Isn't this yummy? I want to clutter it up with some tchotchkes. By AmazingMiniatures.
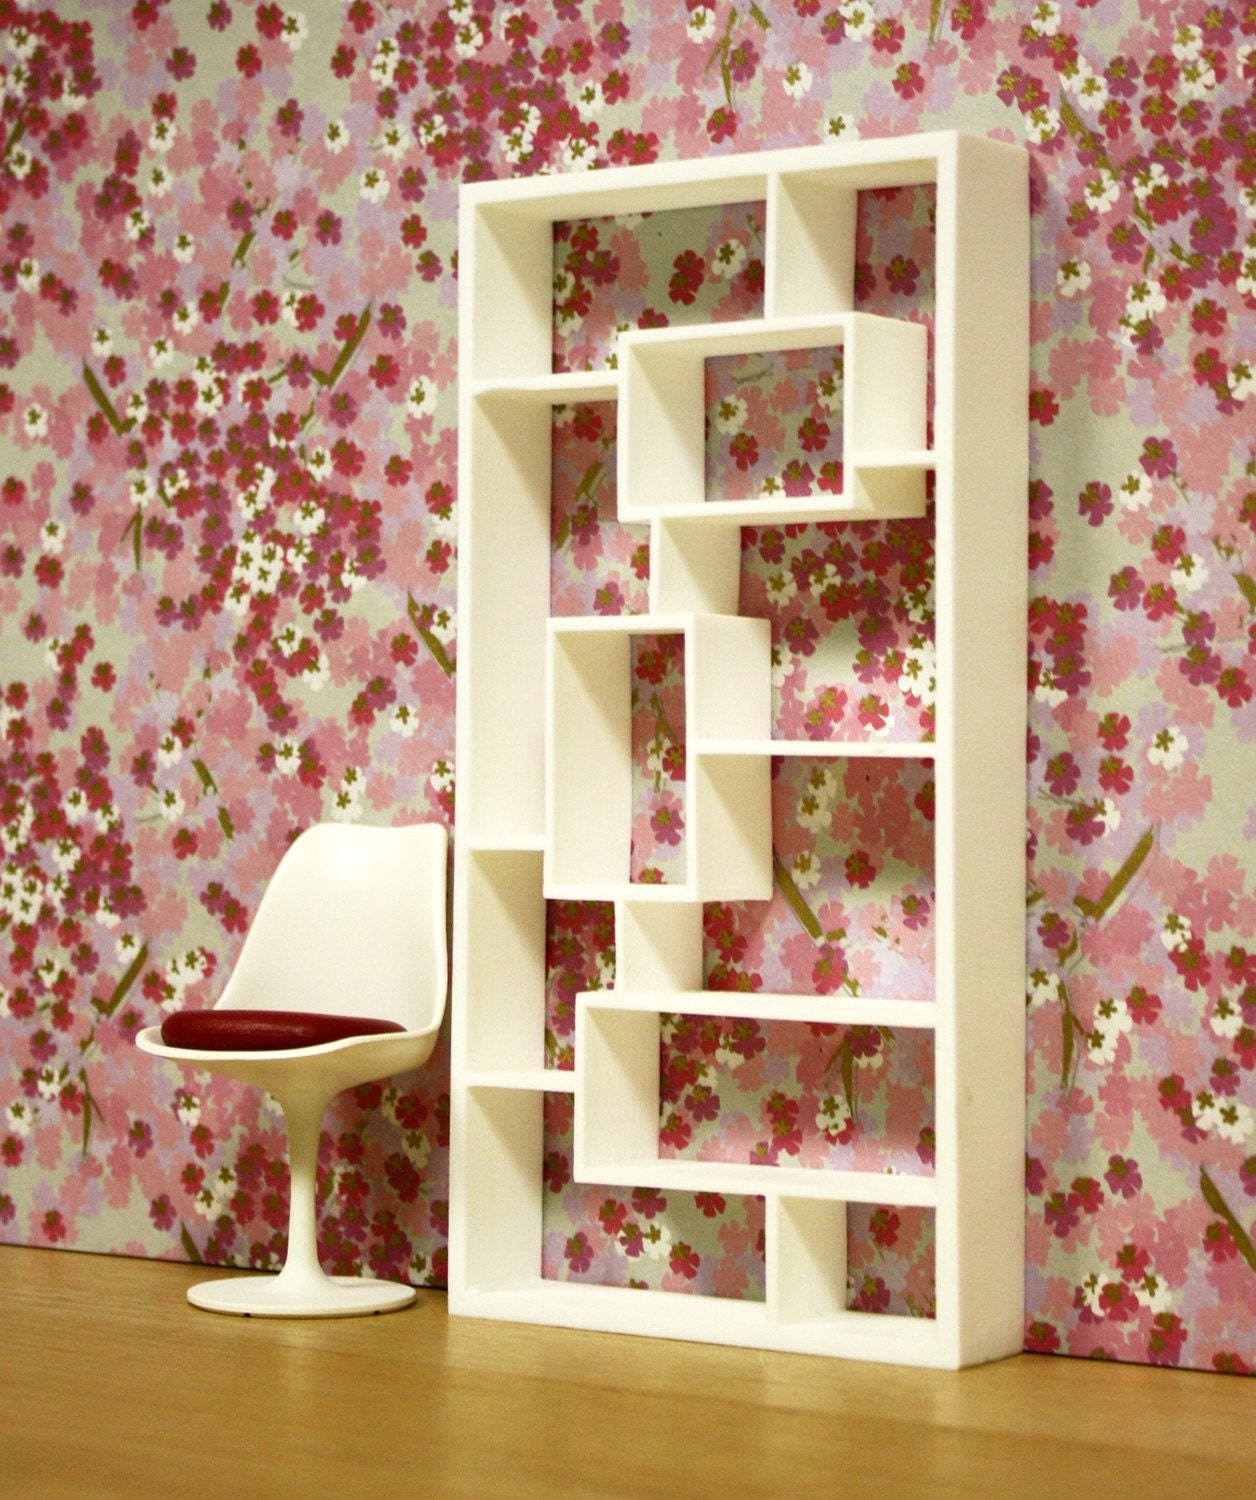
 Look! It's the Expedit from Ikea. I love it. It's probably better quality though -- and you don't have to put it together yourself. She has the Lack side table as well (see the sold items). By Amatheria.
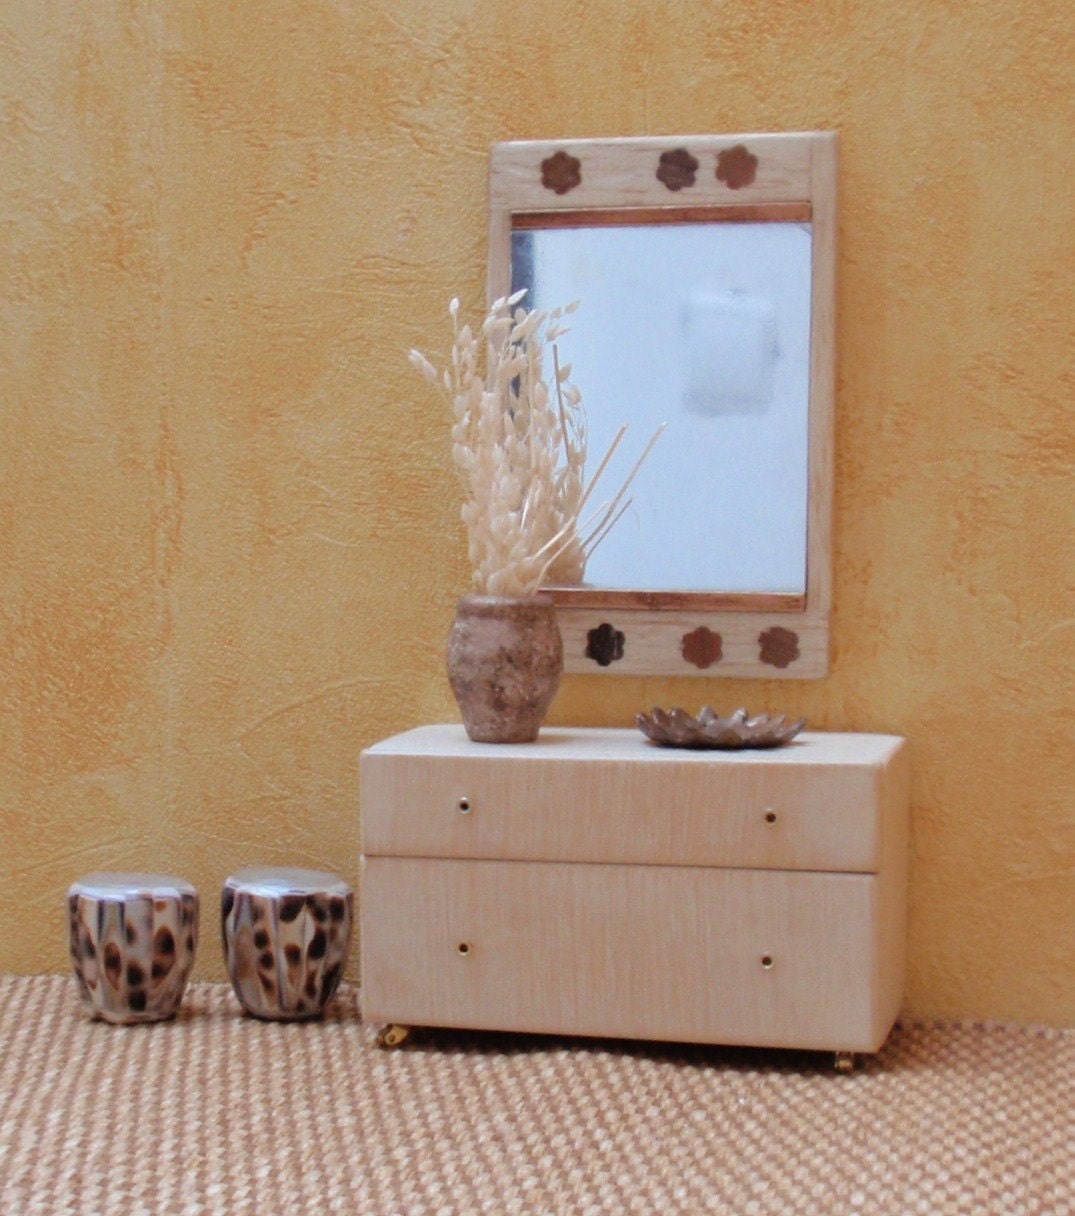
 This is pretty cool. It's even on casters. By miniaturesforever. You know how we love our unfinished pine around here.
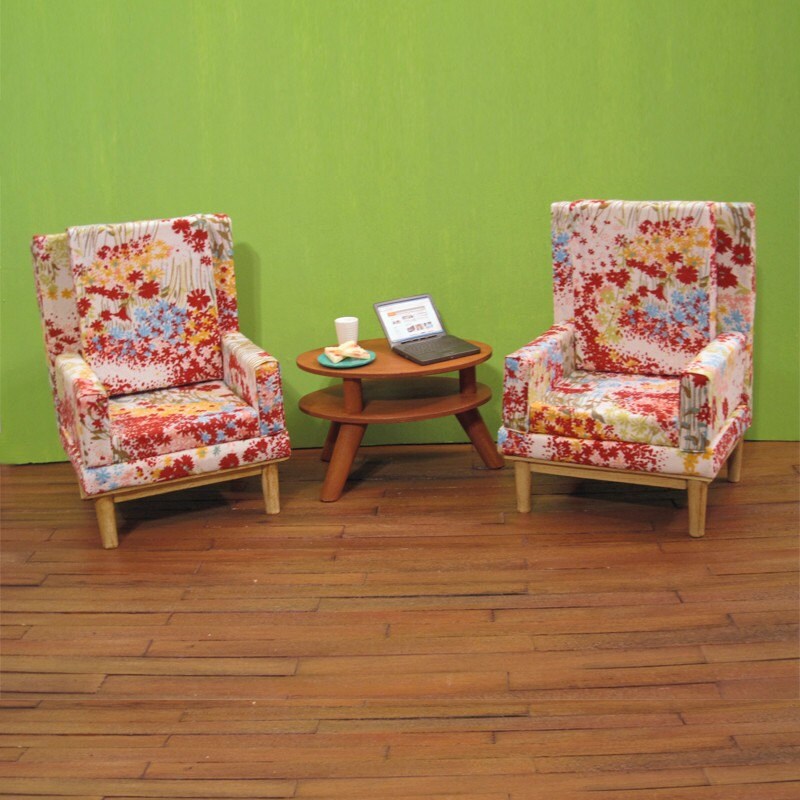
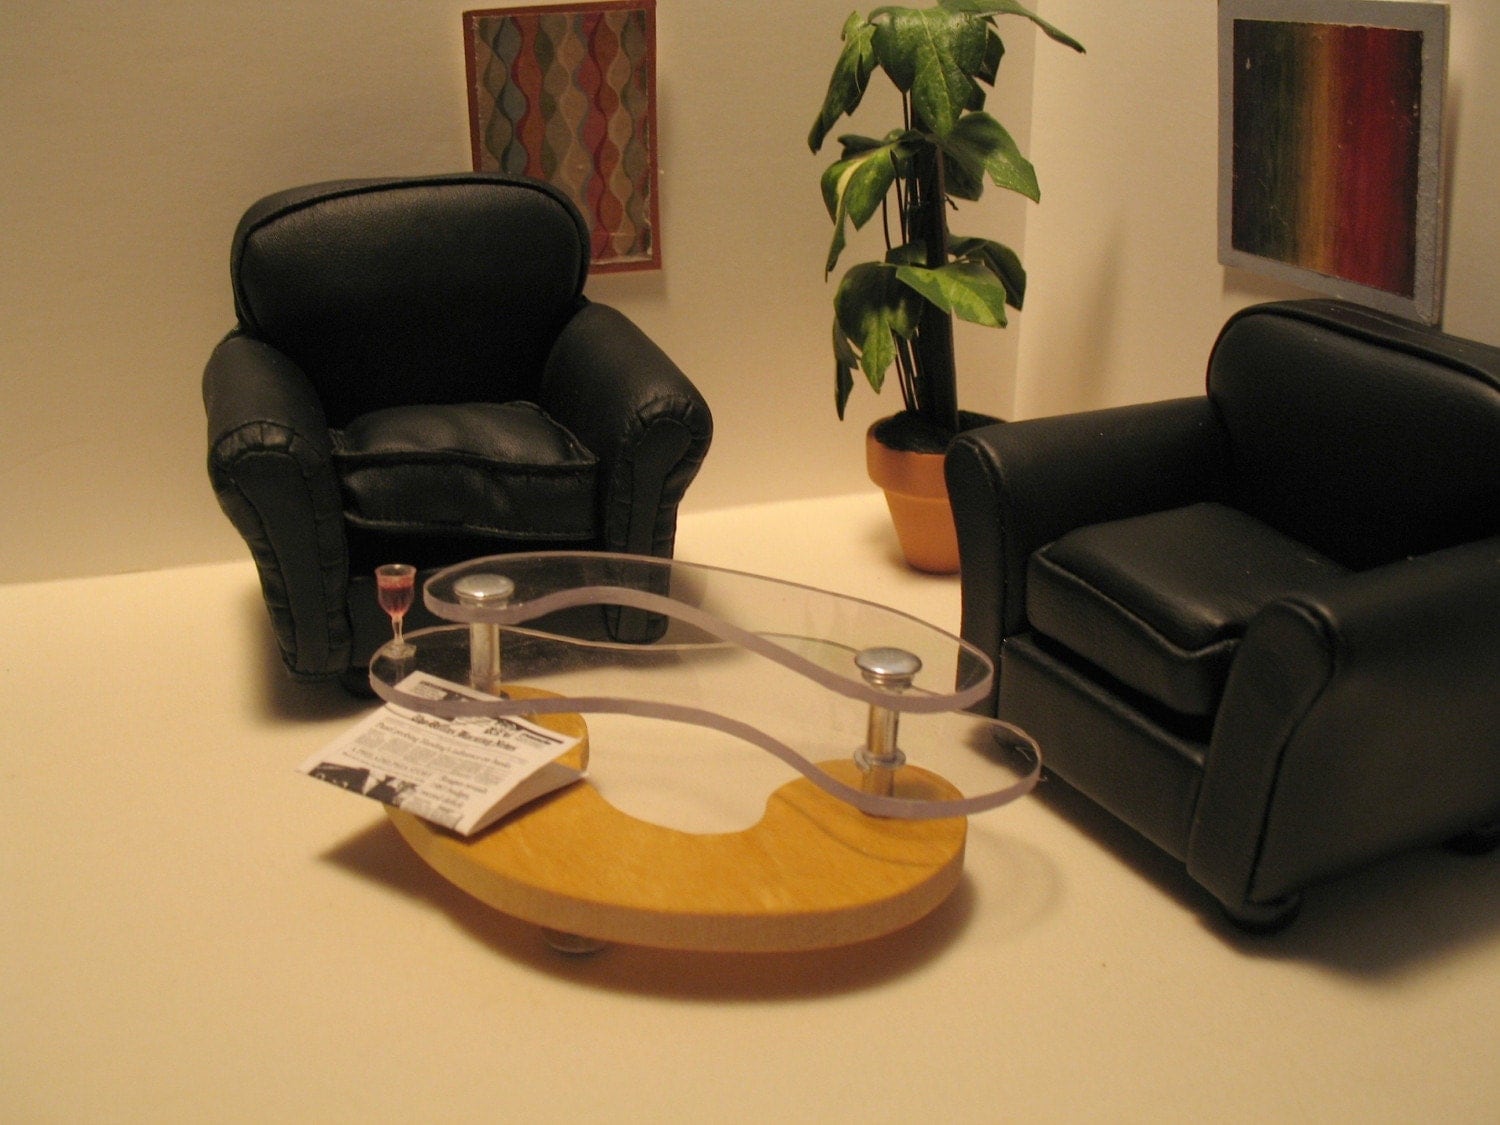
 This whole shop is killing me with it's amazingness but I think I need one of these chairs. By smidgehouse. If I were a bachelor, I'd live in this apartment. It seems as if I have two girlfriends.
 From High Point, NC, furniture capital of America: the Contour Coffee Table. By minibydesign. Another shop whose sold items are phenomenal.
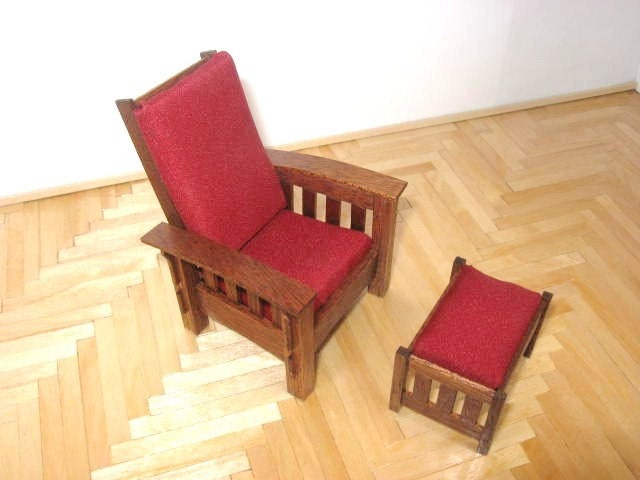
 Who doesn't love them some Mission Oak? And check out that floor. I want that it my real house. By minibuilder.
You probably don't really want to let your toddler play with any of the above. These are for when your kid goes to bed and you pull out the high-end stuff. Check out the rest of the dollhouse posts here. Let me know if you want me to post about the play dollhouse furniture on Etsy. There are some nice pieces at reasonable prices.

You probably don't really want to let your toddler play with any of the above. These are for when your kid goes to bed and you pull out the high-end stuff. Check out the rest of the dollhouse posts here. Let me know if you want me to post about the play dollhouse furniture on Etsy. There are some nice pieces at reasonable prices.
Wednesday, November 24, 2010
Dollhouse furniture review: Ryan's Room

Scale: The pandas fit into the chairs really well. That's Papa and his daughter in the picture. She looks pretty mad in all of the shots. I don't remember what they were talking about. Although I didn't have any other chairs to compare these to, they are similar in scale to the Plan Toys, Educo/Hape, and Le Toy Van. While the furniture is larger than the Calico Critters (Sylvanian Families) characters, this does not seem out of place. These pieces are also larger than the Enchantmints brand, reviewed earlier.
Quality: The quality of these pieces is good. They are not as good as Plan Toys but comparable given their lower price point. They are constructed very well and I don't see these falling apart anytime soon but the attention to craftsmanship is not there. There are some splinters hanging off several of the cuts and the paint job on the grill is messy. The glue is fine -- no problems there. I do really like the detail on the flowers (the stems are wire so they bend).
Overall, I do like the Ryan's Room dollhouse furniture. They have the same style as the Plan Toys so they can be used together without issue. I like that they make use of the packaging. There are illustrations on the box that you can cut out to add "cushions" to the chairs and something to set on the table. That's an interesting touch. There is nice detail on the exterior paint on the Ryan's Room Carry N Play dollhouse that we have as well.
Thanks to Auntie Steph for letting me photograph this before Christmas. I think this will be a major hit.
If you would like to read the rest of the dollhouse furniture reviews, click here.
Tuesday, November 23, 2010
Interview with Catherine Hug


Can you talk about your day job a little bit?
I work as a freelance editor and writer. I have a three-year old daugther and a dog -- and they keep me pretty busy apart from my job and my blog Hyggelig, which I started in 2008.
Note from PROJECT:project -- Catherine also makes and sells some really interesting home decor pieces like these throw pillows and fabric bins/totes from upcycled army gear.

As more toys have been moving in, it is getting more difficult to keep it light and airy. I didn't design the room to go from a nursery to a "big girl's room" -- but changed things here and there a little with her getting older so she can reach most of the toys herself. For example, I put magnets on the inside of the doors of her closet so she can open and close it herself easily. Every time she gets new things to play with, I look for practical storage at the same time. I like sewing little bags for marbles, etc. so everything has a place to be stored. And regularly we look at her toys and she gives some of what she thinks is "for babies" away to younger children we know. I think it is important for a child to have room for imagination and to be creative which is quite difficult in a kids room full of plastic toys that make some kind of noise.
No, nothing, just trial and error. I have no idea how to take pictures; I just know how they should look, so I try and try...

Sometimes it is an old piece of furniture I see or a material (like the old hifi-rack in my mother's house which I turned into the play kitchen) that I want to turn into something new. Sometimes I know exactly what a certain toy or storage should look like and I can't find anything like it, so I try to build or sew it myself. Apart from that, it's so much fun to make things and show my daughter that you can actually build so many things with imagination and a little material.

Yes, things you can find in our home all fulfill a certain function. I don't like things you call in german "Staubfänger" -- which you can translate as dust-gatherers and I'm not a collector. I like to repurpose old things in a new surprising way and I love industrial design and the bauhaus era. Except in my daughter's room it is more playful and colorful.
Thanks so much to Catherine for the interview and for providing us with such great inspiration. Check the previous dollhouse post for more links to her tiny projects. And, of course, add Hyggelig to your Reader. It's not to be missed.
Thanks so much to Catherine for the interview and for providing us with such great inspiration. Check the previous dollhouse post for more links to her tiny projects. And, of course, add Hyggelig to your Reader. It's not to be missed.
Monday, November 22, 2010
Dollhouse furniture is also expensive. Make your own!
Even if you already own some dollhouse furniture, it's always fun to make more. Most of the following tutorials require little more than a hot glue gun and some cardboard. Some take it to the next level with wood and tools. Choose your own adventure.
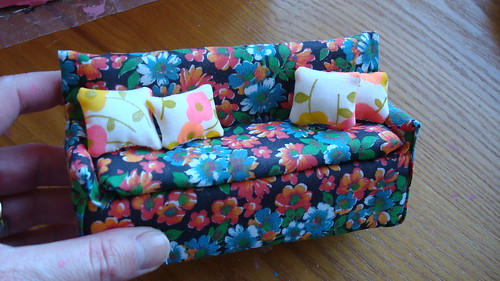
 My friend Mel of Sparklerama, has two tutorials. First, this really cool sofa. All of the instructions are clearly described in her flickr. For this one, you start with a cardboard base, add some batting, cover with fabric, then upholster it. Looks easy. I can't wait to try it. She has several dollhouses for different types of dolls so take a peek at her photostream to get some inspiration.
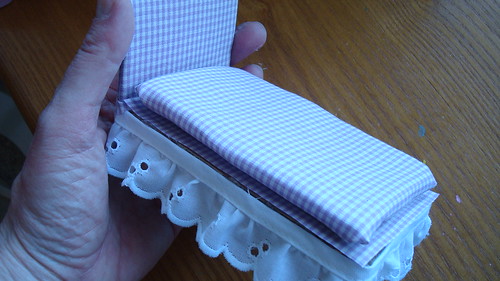
 The second is for this cool bed. It's pretty much the same idea but with fewer steps. Mel has an Etsy shop where she sells miniatures that you should check out. I've got my eye on one of those rugs.
 Catherine of Hyggelig has been busy making some amazing furniture for her daughter. While there aren't any tutorials (and you'll have to translate the site from German), I love the aesthetic and it looks doable. This dining table and bench are lovely. I like family seating like that. It reminds me of going to my Grandma's when I was little.
 I also love this sofa. She explains how she made it very clearly. Click here and here for some other wonderful pieces. And tomorrow we'll have an interview with Catherine so stay tuned.
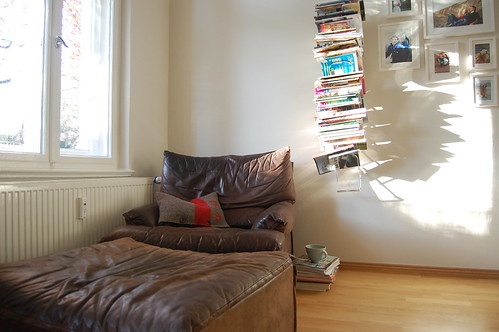
 This gorgeous room is by Joel Henriques of Made by Joel from last week's post. He's using some tools but the simplicity of it makes it much less of challenge. I want that chair in my real life. And I honestly had never really given any thought to foliage in the dollhouse. What a great idea to use a real stick. I'm definitely stealing that idea.
For a little bit of holiday cheer, Ohdeedoh did a feature a couple of weeks ago on dollhouse Christmas trees that you can make.
Finally, I did some old fashioned searching on Google and weeded through the craziness to find this link list on cdhm, Custom Dolls, Houses & Miniatures. While for some of them you need to have a woodshop and a few of Santa's elves, many are simple and use polymer clay. I love the tip on how to add the crumb texture to the cake. It's definitely worth browsing through the tutorials to get some ideas on what you can make yourself.
Saturday, November 20, 2010
Play Dollhouse Guide
 |
| DIY dollhouse furniture tutorials (photo courtesy of Made by Joel) |
 |
| DIY dollhouse tutorials (photo courtesy Cookie) |
 |
| Enchantmints |
 |
| Educo Hape |
 |
| Le Toy Van |
 |
| Plan Toys |
 |
| Ryan's Room |
 |
| Buy handmade dollhouse furniture on Etsy |
Introductory post with information on reviews and scale here.
Another introductory post with links here.
Bias: It was important for me with these reviews that everything be equal. I didn't actually pay for any of the items that I reviewed. CSN provided the Plan Toys sets in exchange for my reviews, I used Swagbucks to buy some sets from Amazon and some sets were gifts for Z for Christmas. Enchantmints is the only company that provided sets outright. None of this influenced my reviews at all. I still feel that the best quality play dollhouse toys are made by Plan Toys (who I never bothered to contact because of the availability on CSN). The cutest good quality stuff is Enchantmints (whose products I would have bought had they not so generously provided them -- and my mom bought Z the bathroom). All the rest is about the same, give or take. Let me know if you have questions.
Thursday, November 18, 2010
Wooden dollhouses are expensive. Make your own!
So I thought I'd put together a little round-up of some of my absolute favorite DIY dollhouses. A huge part of me is regretting not making one this year but it's something we'll definitely do in the future when Z and I can make it together -- probably for bigger dolls. So I guess you could call this, "How not to buy a wooden dollhouse."
Modern dollhouse:
 Isn't this stellar? It's from Made by Joel. His blog is one of the ones that I click on immediately in my Reader when I see a new post. He's very talented and comes up with some great projects to do for kids and with kids. You don't need woodworking skills. The people who work at the "home improvement centers" will do a few cuts for you for free. This looks like one 1" X 6" cut into different widths and a few other bits.
Ikea Catalog Dollhouse:
 This simple tutorial shows you how to take two pieces of cardboard or stiff posterboard and an Ikea catalog to make an awesome house. It's a great project you can do with your kid. From See the Woods and the Trees with an update here. I think that the Flor catalog would work well too. Great interiors.
Bookcase dollhouse:

I found this one ages ago at ohdeedoh. Unfortunately, the flickr account is no longer active so these are the only pictures we have. It's just a simple shelf with awesome furniture inside. You could easily customize this with scrapbook paper wallpaper and some handmade rugs.
Shelf Dollhouse:
 Darlybird just appeared in my life via Grosgrain and was quickly added to my Reader. In a series of posts, she tells us everything she used to make this amazing dollhouse for her kids and includes links to some resources (like where to shop for that awesome re-ment stuff she's got in there). You'll need to read the first post, then click through to the series.
Foamcore Dollhouse:
 Amy from Sweet Sweet Life posted a tutorial on how to make a dollhouse (similar to the Ikea catalog one) using foamcore. The tutorial is here, although the original idea came from Cookie Magazine (r.i.p., beloved tome). She made cute little dolls for it using pictures of Charlie and Lola. She has filled it with all kinds of mini goodness including some Calico Critters stuff that I recognize from my research. Amy's new blog is here.
Finally, there's always About.com. They have compiled a pretty good list of links for plans to make a real play dollhouse -- like cutting wood and stuff like that.
Next week I'll do a round-up post of making dollhouse furniture and more reviews. A couple sets have just arrived. For the rest of the dollhouse posts, click here then scroll to the bottom for links to the other posts. I'll get a link thing on the sidebar going sometime soon.
Oh, special thanks to everyone who was cool about letting me use their images. I contacted everyone I could find as these images don't belong to me.
Modern dollhouse:

Ikea Catalog Dollhouse:

Bookcase dollhouse:

I found this one ages ago at ohdeedoh. Unfortunately, the flickr account is no longer active so these are the only pictures we have. It's just a simple shelf with awesome furniture inside. You could easily customize this with scrapbook paper wallpaper and some handmade rugs.
Shelf Dollhouse:

Foamcore Dollhouse:
Finally, there's always About.com. They have compiled a pretty good list of links for plans to make a real play dollhouse -- like cutting wood and stuff like that.
Next week I'll do a round-up post of making dollhouse furniture and more reviews. A couple sets have just arrived. For the rest of the dollhouse posts, click here then scroll to the bottom for links to the other posts. I'll get a link thing on the sidebar going sometime soon.
Oh, special thanks to everyone who was cool about letting me use their images. I contacted everyone I could find as these images don't belong to me.
Wednesday, November 17, 2010
Dollhouse furniture review: Plan Toys

These sets are all from Plan Toys, a green toy company focusing on making safe, educational products. So not only do they make toys that are safe for kids and more than compliant with all regulations, they also manufacture in clean ways. I have not discussed reviewing products with the company. I'm doing this on behalf of CSN.

Scale: As you can see, these pieces take up quite a bit of space in the Ryan's Room dollhouse. I don't have a problem with that. We chose a small dollhouse on purpose. I will talk more on scale in a later post. The pandas fit in the furniture well but poor Papa had a rough time changing the baby's diaper. The Plan Toys and the Ryan's Room pieces are compatible in size. These pieces are a bit larger than the Enchantmints pieces I reviewed in a previous post.

Quality: Wow. These pieces are really well crafted. Superior. Not a splinter, not a single stroke of paint out of line. And there is a good bit of detail here without being too period specific (too bad those pandas look like they're about to join a cult. I'm going to have to sew them something more contemporary). The crib comes with a little mobile (see just up there on the left), the changing table opens up, the baby's outfit has an adorable hood and is so soft. I love the striped stroller and the vegetables, oh my! The vegetables are stellar. Such detail. You can take them in and out of their little rows and put them in the wheelbarrrow. The shovel has a metal head. I actually was shocked at the quality. While at about $18 a set, they are near the top of the wooden play dollhouse range, it is clear why. You do get what you pay for.

Overall, I'm very impressed by Plan Toys. I have seen their other, non-dollhouse toys and they are of the same quality. These fit well with the theme of our dollhouse and while the Calico Critters are a bit small in comparison, if they were wearing better clothes, you wouldn't even feel they were out of place. I will be making new covers for the bedding though. I am not too into the florals they've got going on.
I'm going to say a few words about CSN stores although I'm not required to. Shopping on the website was really easy. They had lots of different categories and everything fit in them nicely. They also made good use of sidebars on the left and breadcrumbs (some webspeak, yo) at the top. That is so important. They also have a price slider so you can limit to a certain range. Good selection of the eco-friendly stuff that I prefer my kid to play with. Oh, and get this, a friend told me that when she was remodelling her bathroom, if she found something cheaper somewhere else and emailed a link to CSN, they would quote her a cheaper price. Cool. I'm not sure if they are still doing that.
All photos are taken inside the Ryan's Room Carry n Play Dollhouse that we got at our local toy store. My mom also got the Plan Toys gazebo since Z had requested her dollhouse to have an "outside." I think we will have to put that together but all of the stuff above was pre-assembled. If you want to read my other dollhouse reviews, click here then scroll down to the bottom of that post for other two links.
Tuesday, November 16, 2010
Dollhouse furniture review: Enchantmints mushroom cuteness

So here is round one of furniture reviews for my "How to buy a wooden dollhouse series." After seeing this gorgeous fairy collection at our local library, I did some research and found out the whole thing belonged to a local woman who teaches fairy classes to girls. Super cool. She pointed me in the right direction and I was hooked.
This mushroom line is part of the Fairy Forest collection by Enchantmints. They are a US-based company focusing on imaginative products that are quality made, exceeding both US and European safety standards. So just to put this out there: they provided the sets that I am reviewing but that is not influencing my opinion of either the company or the products. I would have bought this stuff anyway (and have it on good authority that Santa is bringing the bathroom set to Meme's house for Christmas).

Scale: I'll talk more about scale among the other sets (Ryan's Room, Educo/Hape, Le Toy Van, and Plan Toys) later. These mushroom pieces are slightly smaller than the others we have. They are slightly larger than the Calico Critters (products I won't be reviewing unless my SIL gets them for her kid for Christmas). But I feel that these work GREAT with our pandas, as you can see in the pictures.
Quality: The quality of these pieces is very good. The painted pieces are especially nice. They are very cleanly made without a mess. The only thing I had a slight issue with the was leaf "rug" that came with the mushroom table and stools. The wood was cut a little roughly around the edges. I quickly took a nail file to it and now it's fine. I don't think there would have been any splinters but I just wanted to be sure. After some play, these edges will probably smooth out. For some reason, lots of dollhouse furniture dining sets come with stools. It's really hard to get dolls to sit on stools. In fact, I find sitting on stools to be a bit challenging.

Overall, I love these pieces. I think they are also a good value. The kitchen and bedroom set comes with five pieces for $15. The little drawers open and close -- the fridge door opens and closes easily; there is a little metal handle on the stove. The bed will fit perfectly in the children's room. The living room set is also very well crafted. No problems with rough edges on the stained (green leafy) pieces. I also think these would work well as outdoor furniture. My neighbors have a fireplace outside with chairs in front of it -- awesome for Fall evenings. Why shouldn't the pandas enjoy such bliss?
All photos are taken inside the Ryan's Room Carry n Play Dollhouse that we got at our local toy store. The furniture fits very nicely inside. And aren't these gnomes amazing? For my other dollhouse posts, click here and here.
Monday, November 15, 2010
The Crystal top


I used this amazing vintage pattern that my Mother-in-Law let me borrow. She made this pattern for my Sister-in-Law's first day of school way back when. Although the pattern is a 3, as you can see, it's huge. This Winter we'll layer with some long sleeves underneath -- or maybe a thermal.


Subscribe to:
Posts (Atom)


